Showing posts with label 11. Show all posts
Showing posts with label 11. Show all posts
Wednesday, April 12, 2017
11 Things to do after Rooting your Android Smartphone
11 Things to do after Rooting your Android Smartphone
Probably if you have landed on this post, probabilities are high that you have just Rooted your Android device, and looking for things you need too do just after you Root Your Android Smartphone. Well on a lighter note, first update a Facebook Staus ;). Just kidding, though it is good measure. SO this post has some steps and things you need to do just after your root your Android Smartphone.

Check Root:
Yes, this is definitely the first, in case you have actually rooted your Android Smartphone. So in the things you need to do after you root your smartphone, the first one is, make sure that you have actually rooted your Android Smartphone. You can do that by a number of ways, there are plenty of root checker apps that available in the Play Store.
Install CWM :
CWM is abbreviated form of Clockworksmod Recovery. Now this recovery is a custom recovery and it would replace the stock recovery that is pre-installed on your Android Device. A Custom Recovery would allow you do various tasks and really make your life simple. It allows you to flash “Zips” right from the phone itself, there would be no need to use a PC Tool to do that in case. Wipe and manage cache partitions and also it allows to manage NAndroid Backups. Soinstalling a CWM recovery on your Android Smartphone stands second, in the list of things to do after you root your Android Smaertphone.
Flash Custom ROMs:
Being able to install and flash custom ROMs is one of the biggest reason that today so many people are rooting their Android Smartphones. Why stick to the old and monotonous interface of the device, when you can get much more interactive looks as well as much more great tweaks with custom ROMs. You can flash custom ROMs and just sit back and enjoy the interface on your Android Smartphone. Actually that is one of the most entertaining advantage of rooting an Andriod Smartphone.
Play HD Games:
Yes no matter what handset you got, when you root your device, there are many advantages and things to do with android after rooting, it and one of them is enjoy HD and heavy games on your Android device, even if it low end smartphone. By rooting you can play some heavy games on your android smartphone even if you smartphone did not support them before you rooted it. Just a few tweaks and that heavy game which did not run first, would run smoothly on the device.
Increase RAM of Android Device:
Yes with Android Smartphone you can do a number of tweaks, and one of them is you can increase the RAM of your Android Smartphone. There are many ways and apps with the help of which you can increase the RAM of your rooted Android Smartphone. As you increase the RAM you can speed up your Android Smartphone. Some methods include using apps, other include partitioning your SD card, and then make your phone use that partition as your phone’s additional RAM which in turn speed up the device. So if you have a slow android smartphone, increasing the RAM is definitely a must thing to do after your root your Android Smartphone.
Increase Internal Memory:
Also some Android Smartphones have really low internal memory like some low end smartphones from Smasung, HTC Etc, which only have around 300 MB of internal memory, and in that case installing apps becomes a pain in your arse. As after installing the most required apps like, Facebook, Whatsapp, etc the memory is almost full and it won’t allow you to install any further app. But do no worry, if you have rooted your Android Smartphone, there is no problem. You can simply increase the internal memory of your Android Smartphone, and it definitely a must thing to do after you root android smartphone, if you specifically have a smartphone with very low memory.
Overclocking:
Overclocking your Android Smartphone is another great thing to do after you root your Android Smartphone. Overclocking is a process by which you just increase the clocking speed of the processor in your Android Smartphone. And in turn the processing speed of the phone will increase and then the phone will perform much faster. But this is not a thing which you must do right after you root your Android Smartphone. As overclocking is not for beginners, and I would suggest if you new to the rooting arena, you should skip this thing as off now. You can get back later when you have enough knowledge about what is really is. As overclocking your android smartphone requires skill, and you should have full knowledge about what you are doing. overclocking can give rise to many issues like heating defects, and also it can decrease the life of your processor, and even brick your device if not done properly. So if you’re a beginner stay from this overclocking thing.
Install themes for Android Smartphone:
Android themes are one great way to increase the productivity and enhace the looks of your Android Smartphone. You can make personalized changes that suit you the best and also change the looks according to you. Just with a few taps, and this is another cool thing to do after rooting android smartphone. Themes are basically free, but some are paid too. You can get the KitKat look, iOS look just by installing the theme on your Android Smartphone.
Install must try apps for rooted phone:
There are many apps that are must try after you root your Android Smartphone. Like there are many apps that you weren’t able to install previously on your Smartphone, as it was not rooted then. Like activating the LED Notification lights after rooting your Android Smartphone, off course your handset needs to support that feature firstly. There are many apps that you must try, and we have made a list of those apps, you can read it from the link below.
Delete Bloatware:
Cleanup all the bloatware from the device. Bloatware means the unwanted stock apps that come pre-installed on the device, and then they cannot be deleted without root. You can delete these kind of apps using various app from the Play Store like the “Root Explorer” or “Uninstall Master”. Also deleting the bloatware from the phone, speeds it up, so it is must thing to do after you root your android smartphone.
Unroot your Android Smartphone:
Well this one is pretty unorthodox. yes you unrooting your Android Smartphone is one of the things that you should do after rooting your Android Smartphone. Sounds funny but yeah, I’m pretty sure on that. Well that actually depends on you. Everything comes with a price, like when you root your android smartphone, you will actually end up voiding your smartphone’s warranty. And there are many more disadvantages after you root your Android Smartphone, but yes there are many advantages too. So if in your case the unadvantages seem to have more impact, may be you should unroot your Android Smartphone. To decide between the facts, Read:
So this was a short post including some things that you should do after rooting your Android Smartphone. I hope this would help you. 
Available link for download

Thursday, April 6, 2017
Acer Chromebook 11 CB3 111 User Manual PDF Free Download
Acer Chromebook 11 CB3 111 User Manual PDF Free Download
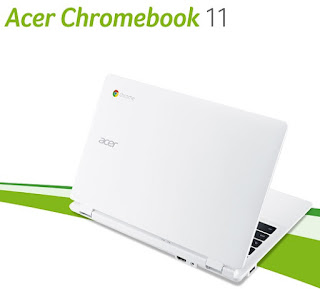
Lost yourAcer Chromebook 11 CB3-111 user manual? No matter, download a new one here. The Acer Chromebook 11 CB3-111 owners manual is now available for download at Acer official website. This Acer Chromebook 11 CB3-111 user manual is available in PDF file format. The size of this Acer Chromebook 11 CB3-111 owners manual PDF file is 4.7 MB. It comes in English. The Acer Chromebook 11 CB3-111 owners manual gives you any references how to operate Acer Chromebook 11 CB3-111 netbook correctly. Please be sure to read all instructions thoroughly and keep them where they will be read by all who use the product.
Tabel Of Contents the Acer Chromebook 11 CB3-111 User Manual
1. Getting started
2. Your Acer Chromebook tour
3. The Chrome OS Desktop
4. Apps
5. Settings
6. Help
7. Information for your safety and comfort
8. Regulations and safety notices
Acer Chromebook 11 CB3-111 Layout
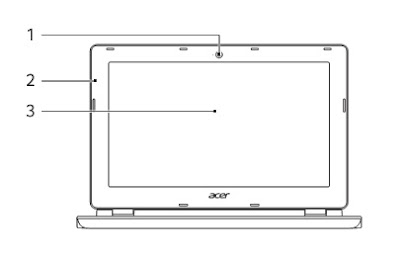
1. Webcam. Web camera for video communication.A light next to the webcam indicates that the webcam is active.
2. Microphone. Internal microphone for sound recording.
3. Screen. Displays computer output.
Acer Chromebook 11 CB3-111 Keyboard View
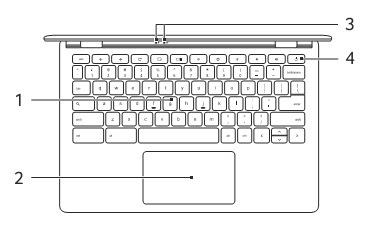
1. Keyboard : For entering data into your computer.
2. Touchpad / click button : Touch-sensitive poi nting device which functions like a computer mouse : Pressing down anywhere on the pad functions like the lef t button of a mouse : Pressing down anywhere with two fingers functions like the right button of a mouse.
3. Power indicator : Indicates the computers power status.
Battery indicator : ndicates the computers battery status.
1. Charging: Th e light shows amber when the battery is charging.
2. Fully charged: The light shows blue when in AC mode.
1. Charging: Th e light shows amber when the battery is charging.
2. Fully charged: The light shows blue when in AC mode.
4. Power key : Turns the computer on and off.
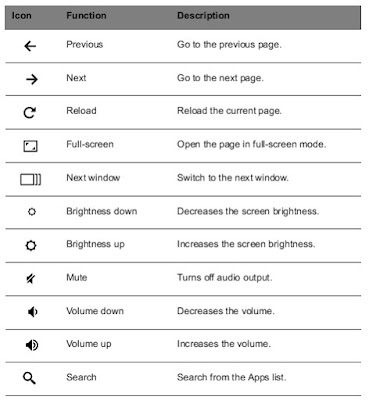
Function Keys
The computer uses function keys or key combinations to access some
hardware and software controls, such as screen brightness and volume.
The dedicated function keys each have a specific function.
hardware and software controls, such as screen brightness and volume.
The dedicated function keys each have a specific function.
Touchpad
The built-in touchpad is a pointing device that senses movement on its
surface. This means the cursor resp onds as you move your fingers across the surface of the touchpad.
surface. This means the cursor resp onds as you move your fingers across the surface of the touchpad.
1. Click : Press down on any part of the touchpad.
2. Right-click : Press the touchpad with two fingertips.
3. Scroll : Place two fingers on the touchpad and move them up and down to scroll vertically, left and right to scroll horizontally.
4. Drag and drop : Click the item you want to move with one finger. With a secon d finger, move the item. Release both fingers to drop the item.
Acer Chromebook 11 CB3-111 Launcher
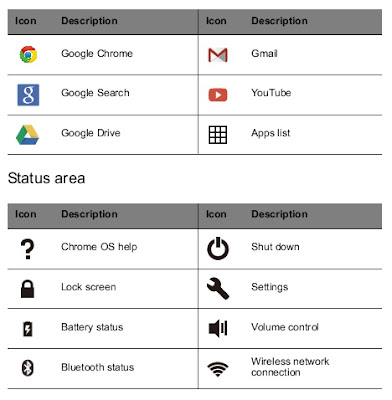
How To Updating Chrome OS
Automatic update
Each time you turn on your Chromebook, it automatically checks for updates. When an update is av ailable, this update icon ( ) will appear in the status area. To apply the update:
Each time you turn on your Chromebook, it automatically checks for updates. When an update is av ailable, this update icon ( ) will appear in the status area. To apply the update:
1. Click the status area of the shelf in the lower-right corner of the screen where your account picture appears.
2. Click Restart to update.
3. Your Chromebook will shutdown and automatica lly restart, with the update applied.
Manual update
To manually check for an update or check what version of Chrome OS you are using:
1. Click the status area in the lower-right corner , where your account picture appears.
2. Click on Settings .
3. In the new tab that opens, click on Help in the left column.
4. If any updates are available, they will be displayed on the page.